First Estate Sale Impression

Going in, I felt nervous; I wasn’t really sure what to expect. I was used to the packed goodwills and thrift stores, people flocking to find new items on the shelves. I had arrived a few hours late after the opening at 9am. I was nervous that everything might have already been gone. I burst through the door, and it was not at all what I thought it would be.

Walking in, there was a table with two women and possibly five people in the house at the most. It felt really weird being in someone else’s home, I wasn’t sure whether to let them know I had walked in or to continue looking around. I went through the home looking for some of the items I had seen online.

I started going through the house searching for some of the items I had seen and kept somewhat to myself. I was hoping to find a vintage mid century clock from one of the photos I had seen. When I got the courage to speak to the owners, they were extremely polite and told me the item hadn’t yet been purchased.

I rushed to the other room to find the piece I had been looking for… and there it was! Right in between the two twin beds, I found my mid century alarm clock.

For the first day, they had told me everything was 25% off, I was able to get the clock for $15 with a discount making it $7.50. It felt like a steal of a deal. There was also a few other items I was hoping to purchase after a few days had passed and their prices started to down to 50% off everything.

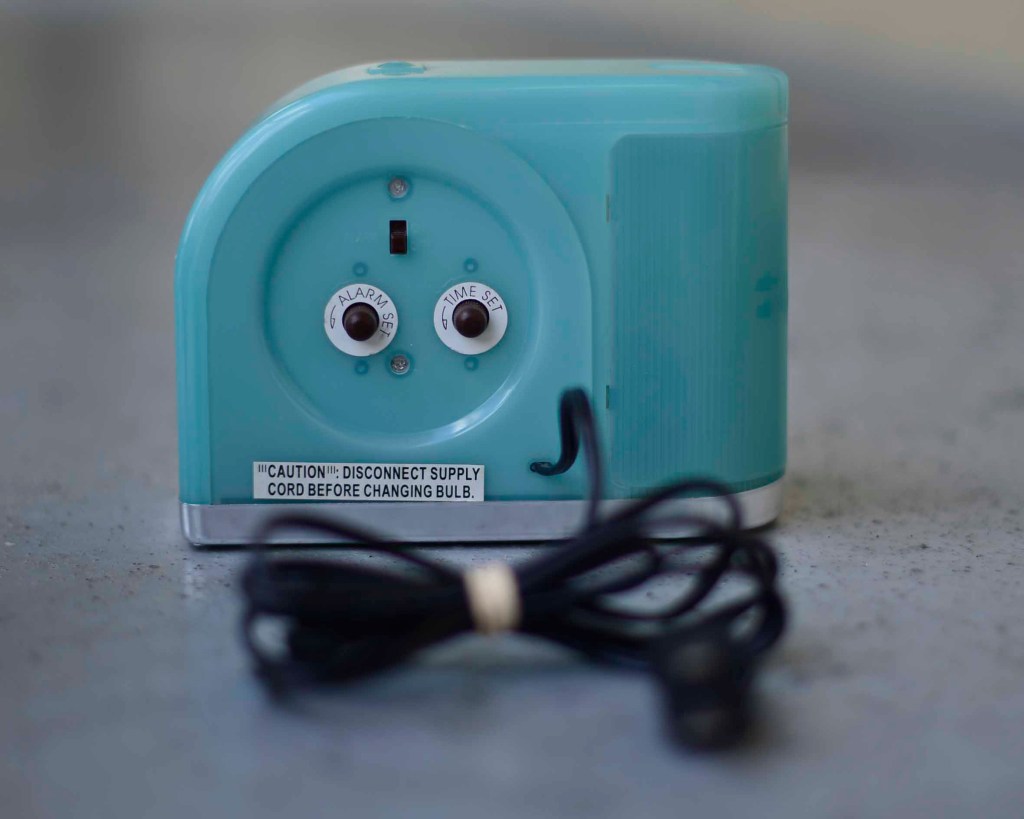
In my excitement, I forgot to check to condition. When I got home and started to list my item, I notice there was a crack in the plastic. One thing to always remember is to check the condition of your item thoroughly before purchasing.

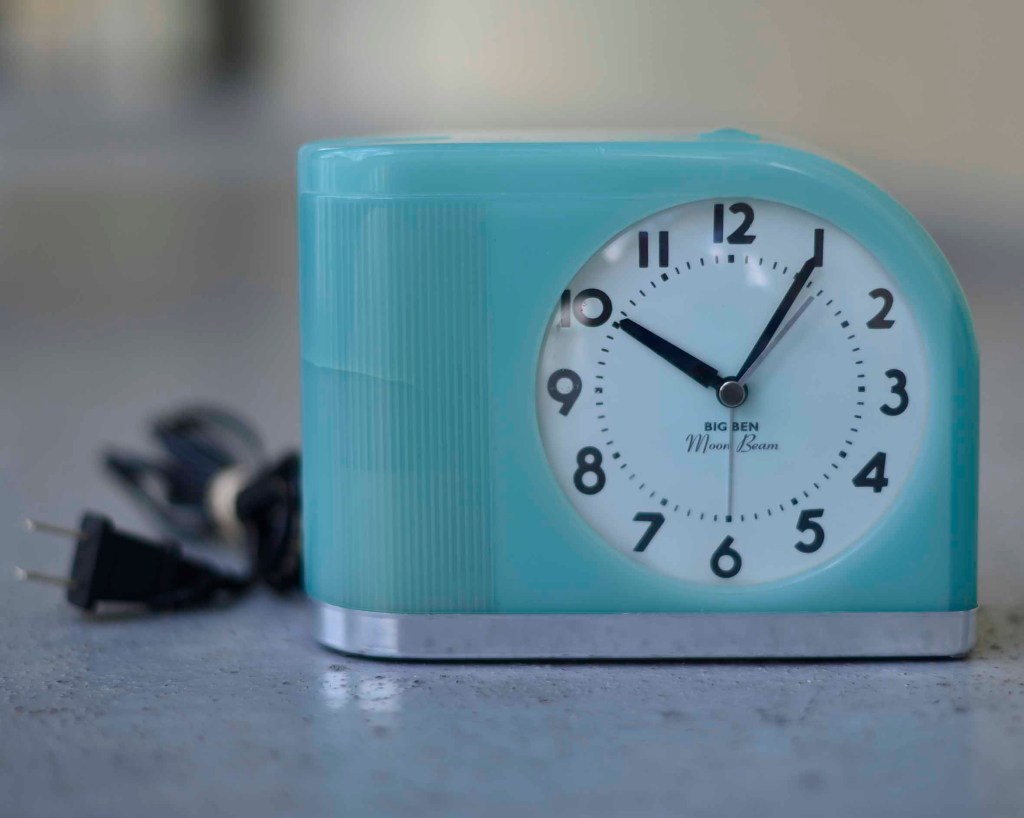
Vtg 1950s Style BIG BEN Moon Beam Alarm Clock

I was a bit disappointed, and now reselling the item, it may not even be able to sell it because of the condition. It’s a beautiful clock but definitely a lesson learned in selling vintage.

If you are interested in purchasing this item, be sure to check out my etsy or ebay shop!

Vintage Thrifting Haul

So call me crazy, but recently I have been getting the idea of selling vintage.

In the past, I have sold vintage clothing but today I wanted to try out a different nache– selling vintage kitchenware. This is definitely a different ball game for me, but it couldn’t hurt to try. I have been nonstop watching and being inspired by Crazy Lamp Lady, a youtuber who sells vintage items and resells them on etsy.

The best part about selling vintage is, you are always able to look up items on your phone to check your profit. It makes thrifting even more easy and accessible to anyone wanting to make a turnaround profit!

So I decided why not try it?

I took to a local vintage shop in my town called Purple Cow, they have some amazing deals on their kitchenware items. I got a lot of my pieces for under a dollar each! Talk about a good deal in comparison to shopping at goodwill for triple to price.

Here are some of the items I picked out of the store,

Bordallo Pinheiro Cabbage plate 7″ dessert pie plate Portugal 1998- Majolica ($0.50)

Waechtersbach W. Germany Flower Coffee Mug ($0.50)

Metlox Poppytaril Rooster Set ($14.00)

If you are interested in any of these pieces, you can find them in my Ebay and Etsy stop.

How To Gain Your First 100 YouTube Subscribers

Hey there,

For those who may not know me, my name is Lilith. I am a gothic fashion and youtuber vlogger, and today I have finally reached 100 subscribers on youtube!

I thought I would share with everyone how I gained my first few subscribers with these 5 tricks you can use to increase your audience. Hopefully my article can help you or give a few pointers in how to improve your chances of gaining more subscribers.

1.) Have a good amount of videos

When it comes to gaining more subscribers, one of the most important things I could recommend on the top of my list is having a good quantity of content. People are more likely to subscribe to a channel when they see you have multiple videos and know you will be continuing to create more material for your audience.

Subscribers will be likely to subscribe to channel when they know there will be new content to come back to. Keep in mind to have a steady pace of videos, try not to spam viewers.Have a day out of the week of when to upload new content and remind your viewers when to check out your latest videos at these specific times. You can even remind them to turn on notifications to notify them of your latest videos!

2.) Have interesting and unique content

Make sure your videos have value to your audience; what is something they can gain from watching your channel? Is your audience learning something new, how to bake a cake? Or maybe you are telling them a story. People will be more likely to subscribe to a channel they can relate to learn, learn from, or enjoy watching.

If you are feeling ambitious, you can write out a few bullet points for your video or even a script. Before I sit down to make a video, I make a list of things or import factors I would like to add. Keeping a list can keep you organized and hep you to not get off track from your subject matter.

3.) Promote to your social media

Make sure you have everyone subscribed to your page, your friends, family, co workers, etc. Promote to all of your social media platforms and share with them when you create new videos along with a way to find the link. You could even create small clips of interesting segments to entice your viewers into going to your channel .

Another quick and easy way to gain subscribers is going to forums or even group pages, ask them to check out your channel and to subscribe. Ask for their input or some topics they would like for you to talk about in future videos. YouTube is like social media, it’s all about building a community and finding out more of what your audience is interested in viewing.

4.) Use tags relevant to your video

A great way for viewers to find you and to find more subscribers is by adding tags to your video, be sure they are relevant to the video. For example if you have a video about cooking an omelet, you could add tags or phrases that relates to your subject. You could say, “How to make an omelet,” “omelet recipe,” “how to cook an egg,” etc. I would try to add as many tags as possible to your video, through time you will start to get a better idea of what to type with experience. Try to write out as much detail of your video in the description as well, this will bring more viewers to your page.

5.) Have a call to action!

At the beginning and end of all my videos, I remind my audience to leave a like and make to subscribe. Having a call to action will make viewers more likely to engage with the person they are watching and more likely to like and/or subscribe. Let them know you are appreciative of them watching and be sure to say thank you!

50 Websites For Stock Free Images

When it comes to blogging, filling you page with photos can increase interest in readers. Fortunately, we are not able to always use photos from the internet freely because of copy right infringement. 

To prevent such an occurrence, I recommend using these websites for royalty free images. 

1.) Unsplash – https://unsplash.com

2.) Pexels – https://www.pexels.com

3.) Stockvault – https://www.stockvault.net

4.) iStock – https://www.istockphoto.com

5.) Freeimages – https://www.freeimages.com

6.) Stocksnap – https://stocksnap.io

7.) Burst – https://burst.shopify.com

8.) Reshot – https://www.reshot.com

9.) Shutterstock – https://www.shutterstock.com

10.) Pixabay – https://pixabay.com

11.) Freepik – https://www.freepik.com

12.) Stockfreeimages – https://www.stockfreeimages.com

13.) Openphoto – https://openphoto.net

14.) Visualhunt – https://visualhunt.com

15.) Skitterphoto – https://skitterphoto.com/photos

16.) Picjumbo – https://picjumbo.com

17.) Foodiesfree – https://www.foodiesfeed.com

18.) Fancycrave – https://fancycrave.com

19.) Kaboompics – https://www.kaboompics.com

20.) PicxClicx – https://www.picxclicx.com

21.) Picography – https://picography.co

22.) Splitshire – https://www.splitshire.com

23.) Depositphotos – https://depositphotos.com

24.) Photoeverywhere – https://photoeverywhere.co.uk

25.) Getrefe – http://getrefe.com

26.) Myfknfreephotos – https://myfknfreephotos.tumblr.com

27.) Mmtstock – https://mmtstock.com

28.) Rawpixel – https://www.rawpixel.com

29.) Negativespace – https://negativespace.co

30.) Gratisography – https://gratisography.com

31.) Splitshire – https://www.splitshire.com

32.) Startupstockphotos – https://startupstockphotos.com

33.) Isorepublic – https://isorepublic.com

34.) Superfamous – https://images.superfamous.com

35.) Rgbstock – http://www.rgbstock.com

36.) Pdpics – http://pdpics.com

37.) Snapwiresnaps – https://snapwiresnaps.tumblr.com

38.) Burst – https://burst.shopify.com

39.) Jaymantri – https://jaymantri.com

40.) Stokpic – https://stokpic.com

41.) Libreshot – https://libreshot.com

42.) Idpinthat –  https://www.idpinthat.com

43.) Photogen – http://www.photogen.com

44.) Goodfreephotos – https://www.goodfreephotos.com

45.) Imcreator – http://imcreator.com/free

46.) Thepatternlibary – http://thepatternlibrary.com

47.) Morguefile – https://morguefile.com

48.) Bucketlistly – https://www.bucketlistly.blog/photos

49.) Barnimages – https://barnimages.com

50.) Yeahstockphotos – http://yeahstockphotos.com

What did you think of my list? 

Feel like I missed any of your favorites? 

Let me know in the comments below!

Why I Stopped Selling With Poshmark

When it comes to reselling old clothes, Poshmark comes up as one of the top apps in any app store. It is a place for women or men to sell used clothing, and mostly name brand products, at a cheaper price. Unfortunately, I have found many issues with the app leading me to delete my account. As a reseller, I can assure you to not use this app and the reasons why by the multiple problems I had encountered.

At first, I was selling products left and right. It felt great to clean out my closet while making some extra cash on the side. 

I remember the trouble starting when received my first costumer complaint. I had sold a pair of shorts, and in accordance to the customer, the zipper didn’t work and wanted to return the item. 

As a buyer, and someone who has personally worn the shorts, I had never encountered this problem and knew something was fishy.

I never received my item back and there was no one who I could speak to about the customer stealing my item. I brushed off the issues and continued to use the site. 

The second encounter of another customer stealing my product was with a pair of under armor shorts. The buyer complained I sold them Nike shorts, not Under Armor. I then again, looked for a place to contact a representative or a way to contact just anyone. There was no email or even a phone number on Poshmark’s page.

I knew for certain I was not getting those shorts back, and still to this day have not received them. Not only did I not get my shorts back, they got a complete refund before confirming with me of their product.

I had enough and decided I was not going to use the app again, and instead stuck with websites like Etsy, Depop, And Ebay, who ensure Buyer and Selling warrantee along with a way to contact a representative.

4 Ways To Increase Traffic To Your Facebook Page

Starting out, it may seem overwhelming and a little discouraging at first. You just created your first Facebook page but you are not receiving any likes or as much engagement as you were hoping. Fortunately I have created a list of 4 tips you can apply to your page that will guarantee an increase in activity!

1.) Invite all your friends to like and share your page.

Starting off your page, Facebook usually gives great pointers and tricks to help get your new page. I would suggest sending an invite to all of your Facebook friends on Facebook. Everyone needs to know what you are wanting to sell or promote. You may not be convinced your self yet, but it is all about faking it until you make it.

2.) Send personal messages to close friends and family asking to share to your page and invite their friends.

The more people know what you do the better, successful business can soar off by a friend of a friend recommending their business. Message everyone and write a personal note or message inviting them to your page and to support your business. Tell everyone you know, when you are in line at the grocery store, out getting coffee, or buying new clothes, strike up a conversation about your business. Have a business card to keep handy when someone asks for your information.

3.) Share to your other social media platforms

Be sure to promote your Facebook page to all your other pages. Networking is all about promoting everywhere and anywhere you can. You can create additional social media pages such as Instagram and Twitter to reach out to a larger audience.

4.) Promote to Facebook groups with similar interests, public or private. 

Look for similar group pages for your business. If you are apart or have joined any group pages, promote and ask them to like or share your page. Give a call to action! More people are more likely to “like” your page if you ask them to do something .

For example, I am a photographer. I went to all the local photographer Facebook pages asking for them to like and share my page, along with a link to my Facebook page in the description. Within a few hours, I had gained over 100 likes!

When starting a business, it is essential to share with everyone you know of what you do. People are more likely to share, give advice, and promote your page as a personal reference. Try sharing your page every other week to your social media platforms, growing a business takes time and patience.

Did these tips help you?

Do you think I missed anything?

Let me know in the comments below!

How to Bleach and Dye Armpit Hair Safely

When it comes to bleaching, it may be hard to find the right product to do the job. Especially for darker areas such as pubic or armpit hair. For myself, as tried and true, I have used Sally’s product and received fabulous results. There was little to no irritation and would gladly recommend their product to other users.

So with that said, let’s begin!

The first thing to dying your armpit hair is bleaching, for myself I used Sally Hansen’s Extra Strength Bleach Cream For Hair and Body. Hair pigment may differ with each person, along with texture, meaning the processing time can vary. I have extremely dark brown hair, so it took me two tries to get the right color.

Before bleaching, make sure to have clean hair, wash your armpits if you have used deodorant or if you haven’t showered recently. It’s good to remove any natural oils in your hair so the bleach can attach to the hair follicles more effectively.

Mix your beach and developer using the small cup, add 5mg of activator to your mixer, then apply 15mg of bleach paste, mix evenly. I ended made too much paste and using the excess amount for my upper lip and chin; you can try using half the amount suggested to save excessive product from going to waste.

When you feel you have a perfect mix, apply the crème on to both armpits. For myself, it took about two tries to get a good blonde color. The first 15 minutes of bleaching left my hair orange, so I went ahead and applied the bleach again for 8 minutes to get the perfect color. The orange is my natural undertone color, each person can vary in undertone and the amount of time needed to fully bleach their hair.

When appling your hair dye, I would suggest using gloves and your fingers to spread the dye. For my pick of color, I went ahead and used my manic panic enchanted forest dye.  

Wait 20-30 minutes for the dye to process you can take this passing time to watch an episode of Netflix… or by even watching one of my YouTube videos!

To remove the dye, I found it best to take a quick shower with gloves to make sure your hands are protected. Wash thoroughly, your skin will be dyed for the next few days but should come off eventually with another shower or two. 

When you have dried off, be sure to look in the mirror and check out your new look!